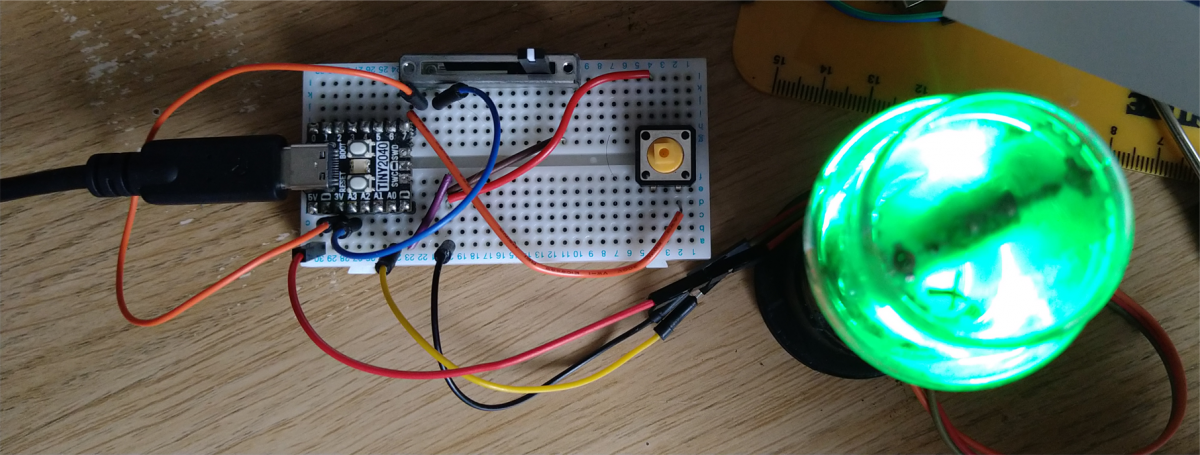
Phil’s working on some interactive electronics for a project, and he was asked to create a counter that could show how much money you could make from 20p recycling deposits. The counter + button in a #circuitPython was easy to implement (see other “weekly project” posts for a “how to”) – But playing an MP3 file has become incredibly easy with CircuitPython, having the library / code built in to the system! so no need to add a new library or even extra electronics to your CircuitPython Powered Board of Choice! (We’ve been using the Raspberry Pi #Pico & the Pimoroni #Tiny2040 )
Below is a short video of the Tiny2040 + button + mono speaker counting up when the counter value is sent to a function that converts it to a list of MP3’s to play.
Phil took a while to create an algorithm to create a “sentence” that stitches together the necessary files needed… using small MP3 files saved to the 8mb Tiny2040. The numbers 1 to 20 were recorded, then, 30, 40, 50, 60, 70, 80 & 90. Phil also created with a speech synthesiser, “pence”, “and”, “pound”, “pounds” – which can then create any number up to 999 (Thousands + were unnecessary at the moment!) When it reaches “£100” – a clip saying “you’ve made a lot of money, perhaps donate it to charity?” is spoken, then the counter resets !
The code below is Phil’s “Robust” programming… which works nicely, and can even cope with increments of 5p – but single counts break it (his “logic” should be improved – but the 5 / 10 / 20p increments work!
# SPDX-FileCopyrightText: 2020 Jeff Epler for Adafruit Industries
# Custom Code by Philip Thompson / Digital Maker CIC
# SPDX-License-Identifier: MIT

"""CircuitPython Essentials Audio Out MP3 """
import board
import digitalio
from time import sleep

from audiomp3 import MP3Decoder

try:
    from audioio import AudioOut
except ImportError:
    try:
        from audiopwmio import PWMAudioOut as AudioOut
    except ImportError:
        pass  # not always supported by every board!

button = digitalio.DigitalInOut(board.GP0)
button.switch_to_input(pull=digitalio.Pull.DOWN)


audio = AudioOut(board.A0)
# You have to specify some mp3 file when creating the decoder
mp3 = open("none.mp3", "rb")
decoder = MP3Decoder(mp3)
decoder.file = mp3
audio.play(decoder)

# calculate money from number stuff

def convertArrayToString(a):
    return(' '.join(map(str, a)))

def last_digit(num):
    if 10 < num < 20:  # it's a teen!
        return [str(num)+".mp3"]
    else:
        last_digit_unsigned = abs(num) % 10
        return [str(num)+".mp3"] if last_digit_unsigned == 0 else [str(num)[0]+"0.mp3", "5.mp3"]

# used in making a sentence of the value of the number
ppp = ['pence.mp3']
lb = ['pound.mp3']
lbs = ['pounds.mp3']

def numToMoney(v):
    if v < 20:  # unique "quick returns"
        return([(str(v)+".mp3")] + ppp)
    elif (v > 9999):  # no one will make this much money from recycling!?
        return(["too_much.mp3"])
    elif (15 < v < 100):  # just pence
        return(last_digit(v) + ppp)
    else:
        tupV = str(v)
        if len(tupV) == 3:
            if (tupV[0] == "1"):
                lll = lb
            else:
                lll = lbs

            if (tupV[1] + tupV[2] == "00"):  # flat £
                return([tupV[0]+".mp3"] + lll)
            else:
                if tupV[1] != "0":  # not a "x pounds tens pence
                    return([tupV[0]+".mp3"] + lll + ["and.mp3"] + last_digit(int(tupV[1]+tupV[2]))+ppp)
                else:
                    return([tupV[0]+".mp3"] + lll + ["and.mp3"] + ["5.mp3"] + ppp)
        else:
            if (tupV[1] + tupV[2] + tupV[3] == "000"):  # flat £
                return([tupV[0]+"0.mp3"] + lbs)
            else:  # complicated number x pounds y (z) pence
                tA = tupV[0] + tupV[1]
                tB = tupV[2] + tupV[3]
                if (tB == "00"):
                    s = [tA+".mp3"] + lbs
                elif (tB == "05"):
                    s = [tA+".mp3"] + lbs + ["and.mp3"] + ["5.mp3"] + ppp
                else:
                    s = [tA+".mp3"] + lbs + ["and.mp3"] + last_digit(int(tB)) + ppp
                return(s)


# res = arr[::-1] #reversing using list slicing
def money(n):
    moneyArray = []
    moneyArray.extend(numToMoney(n))
    #print(moneyArray)
    for w in moneyArray:
        decoder.file = open(w, "rb")
        audio.play(decoder)
        #print("playing", w)
        while audio.playing:
            sleep(0.1)

counter = 0

while True:

    while audio.playing:
        pass

    if button.value:
        counter += 20
        money(counter)
        sleep(0.3)
        if counter > 9999:
counter = 0The Button is in Pin GP0 & the Speaker Signal Out is in pin A0 … you can’t get simpler! Amazing! MP3 files played with CircuitPython on a Tiny2040 – Done!


